In the beginning Plesk perplexed me
If you are perplexed, you feel confused and slightly worried by something because you do not understand it. Plesk is however the best server administration tool I have worked with, for making complex hosting easy.
In the begining Plesk confused me, because even tough I understood the purpose of the different components in the solution, I was uncertain how to configure the software to play nicely with Plesk running: Nginx reverse proxy, Apache web server and Phusion Passenger application server as Apache module.
Inside my Node application I used Express HTTP server and Sequelize Object Relation Mapping (ORM) framework to talk to the shared MariaDB database.
When to use Plesk for hosting
If I wanted to build a application to scale out to hundred of thousands of users I would properly build a cloud solution on AWS, Azure, etc. For many applications the complexity of scaling out that cloud solutions are good at, is not needed. Scaling up on a single server is often enough for most applications and you should always try to keep things simple, because less is more.
In this post I will write about my experience hosting Node applications using Plesk on a Virtual Private Server from Contabo, that can host up to 10 websites. Plesk uses Nginx reverse proxy, Apache web server and Phusion Passenger for hosting Node applications. Plesk runs on Linux and Windows and supports hosting Docker containers, if you want to easily run a Jenkins test automation server in development. For security reasons I would not recommend using Docker on Plesk for hosting production applications, instead you can host most any application using the Phusion Passenger application that runs as a Apache module in Plesk.
Developing Plesk extensions
Try to install Docker Desktop and the Plesk docker image, if you want to play around or build your own Plesk extensions. After starting the Plesk docker container login as described on the docker image and go to Extensions menu and install “Panel.ini editor” and the use this extension to add the lines:
[ext-catalog]
extensionUpload = true
Next time you go to the extension menu you should see the option to upload your own Plesk extension as a zip folder. Read the Plesk extension development guide or try and upload the example extension.
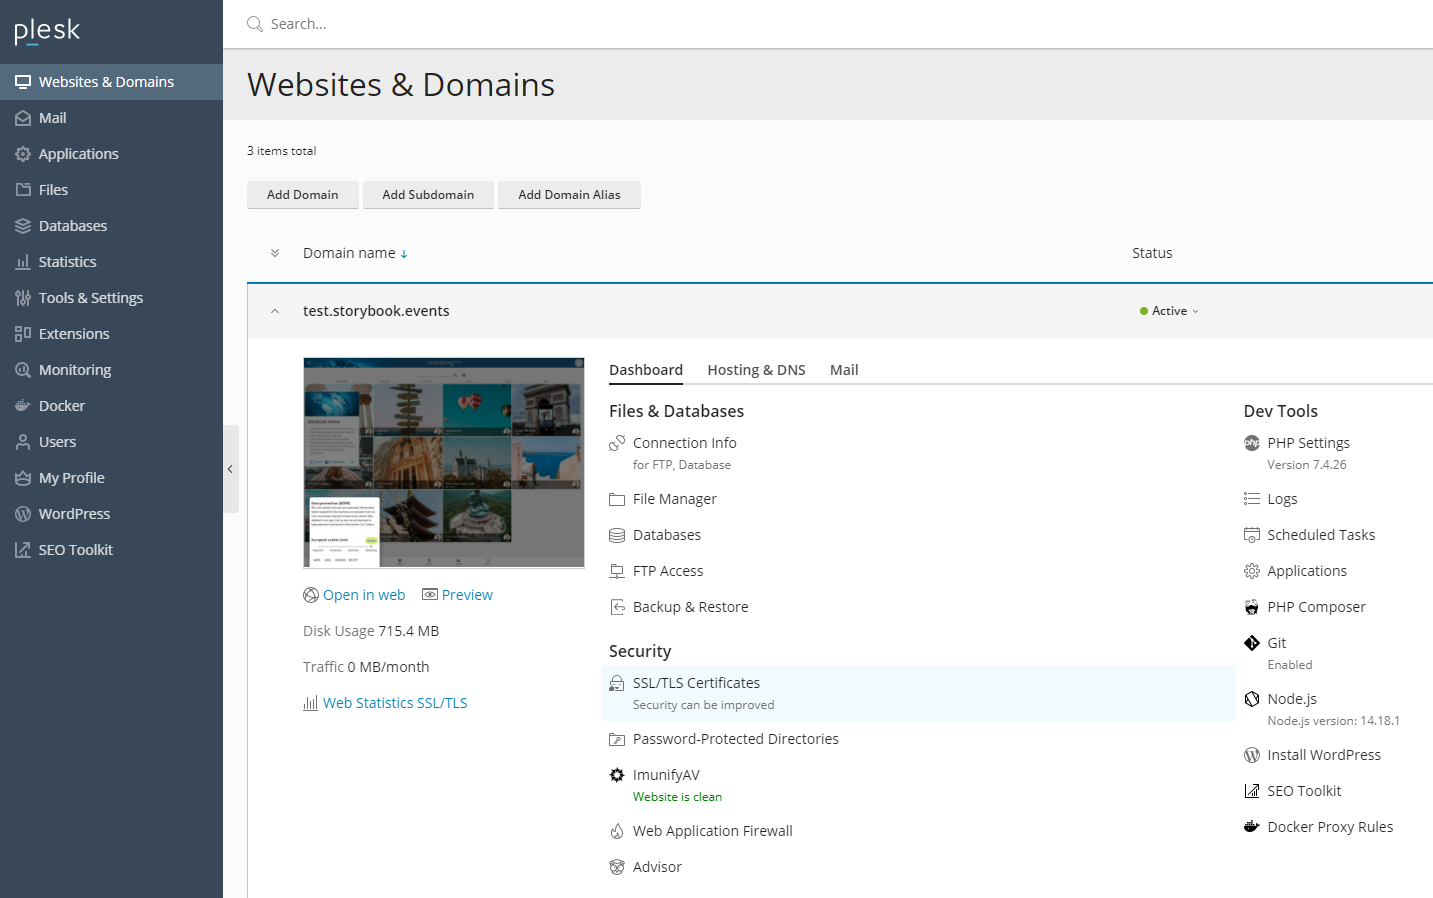
Hosting Node applications on Plesk
In Plesk under Tools & Settings menu go to Plesk and Updates, that will open the Plesk installer in a new browser tab. Press add and remove components and make sure to install Git, NodeJS support, Phusion Passenger server.

In Plesk under Websites & Domains create a new domain, with a unique Linux username and password and a unique database name and owner. Under Security select the free SSL/TLS certificates from LetsEncrypt, but only for the domain not email, otherwise you must manually maintain a TXT DNS record, every time Plesk automatically renews your certificate every month.
To deploy your code go to your website and setup the Git integration to pull from a branch in your Git repository. Note that Plesk does not support Git tags, so if you have a professional development flow with: development, testing, staging and production, then you should create branches like: develop for local development and sprint demo on testing, stage branch for hotfixes in production and main (master) branch for deployment in production.
 On the Git integration page press the button “Pull updates” to the right and once its done, you can press Commit Logs link to see what changes were pulled from Git. Read this article for using “Enable additional deploy actions” if you need to run database migration or restart service after deployment.
Setting up your Node application under the websites Node.js menu, requires defining only a few settings.
 You must first select the Node.js version that you tested on in your development setup. When Plesk updates are automatically deployed, your choice of Node versions will change. You should update your Node version and dependencies on a regular basis, and follow the Node release plan.
The Application Mode or NODE_ENV variable is normally development or production, but you can write your own mode name like testing or staging. Node only understands development and production mode, therefore you need to add a custom environment variable NPM_CONFIG_PRODUCTION=true for staging or false for testing, that npm will use to decide if development dependencies will be installed.
Specify the custom environment variable for timezone (TZ) or the server would have a default based on where it is located, like “Europe/Copenhagen”. For most applications you want the backend to use UTC timezone and the frontend to display local time, therefore you on the server define the custom environment variable TZ=UTC.
Restart app error logs
Pressing the Restart App on the node application, will write a restart.txt to the website and next time you browse to the website, the Phusion Passenger server will restart the application. All Node applications write to the system wide Apache log /var/log/httpd/error_log that can only be accessed from a terminal:
ssh -l root <vps-hostname>
tail -n 50 /var/log/httpd/error_log
The logs folder for any websites can be found in Plesk under Files and the website or at the terminal.
cd /var/www/vhosts/<domain>/logs
It is not possible to see the Node application errors related to npm install of dependencies, without tailing the /var/log/httpd/error_log in a terminal.
Npm install and Run script
Pressing npm install will look for package.json files in the httpdocs folder and any subfolders and run npm install for each package.json found.
For normal dependencies this will work fine, but if some dependencies require special install options you may need to add a npm script and run this for proper installation.
First open Plesk file manager and add .npmrc text file in httpdocs folder with:
scripts-prepend-node-path=true
Then open the httpdocs/package.json and add the special npm dependency install script for example:
To run any of these package.json scripts press the Run script button and type the name of the script like:
install-puppeteer,
install-sharp
npm-force-install-fsevents
In the Puppeteer example we ignore and invalid certificate and for the sharp image library we need to specify the architecture and platform or the library will not install.
Some dependencies have optional dependencies like fsevents, that are only needed on Mac, because Windows and Linux have build in support for this. But Plesk npm install will report warnings that can be avoided by forcing an installation of a Mac dependency on CentOS, even tough it will not be used.
In newer versions of npm these optional dependencies should not cause warnings. Running npm install –no-optional to install dependencies without optional dependencies is not recommended and can cause side effects.
The MariaDB database
The default character set for MariaDB databases created with Plesk is often utf8, but for very old database versions it could still be latin1 with collation latin1_swedish_ci. Since MariaDB 10.6 utf8 now means 4 bytes (utf8mb4) instead of 3 bytes (utf8mb3) . For application like OpenSimulator that still require utf8 to mean utf8mb3, you can specify the old mode equal empty string (old_mode=) in the my.cnf on Linux or my.ini on Windows.
Plesk has several options for integration, one of which is Event handlers, that receive different input parameters.
To change the default character set used when creating a MariaDB database in Plesk use event handler for Database created.
- Connect to the Plesk server via SSH on the terminal in Mac or Git Bash on Windows.ssh -l root <vps-hostname>
- Create the file
/root/dbscript.shwith the following content:#!/bin/sh
db=${NEW_DATABASE_NAME}
plesk db “ALTER DATABASE $db CHARACTER SET utf8mb4 COLLATE utf8mb4_unicode_ci” - Set the correct permissions:
chmod 0775 /root/dbscript.sh
- In Plesk, go to Tools & Settings > Event Manager and click Add Event Handler.
- Choose the event type to be Database created, put the following in the command section and press OK:
/root/dbscript.sh
The next time you create a database it would be created with utf8mb4 character set and collation utf8mb4_unicode_ci for sorting case insensitive.
utf8mb4_unicode_ci
is an old Unicode standard supported by most databases.
utf8mb4_unicode_520_ci
is the latest Unicode standard supported in MariaDB 10.2 and later
utf8mb4_0900_ai_ci
is the latest Unicode standard supported in latest MySQL 8 and later
In Plesk under databases and your domain select phpMyAdmin. On the SQL tab write the following query and press Go button in the right side.
show variables where variable_name like ‘%database%’
This will show your current database character set and collation. To find the newest Unicode collation supported by your MariaDB version run this query:
show collation like ‘utf8mb4_unicode%’;
If you only store one language in your database you could use the special Unicode language collation, but I prefer the default collation to support multiple language collations and then add the collation to the query when needed. In the below example I add Danish collation to sort message column with the special Danish characters properly ordered in the Sequelize ORM framework.
// Sorting Danish characters with multi language
// database collation utf8mb4_unicode_520_ci
let query = {
  attributes: [ 'message' ],
  order: [
  [ sequelize.literal('message COLLATE utf8mb4_danish_ci'),
    'ASC']
  ]
}
let result = await Log.findAll(query);